Teradata to Oracle (On-Prem & OCI Autonomous) Migration Guide
- Mar 17, 2025
- 3 min read
Updated: Feb 6
Read my bog for strategical high-level steps - https://www.aitechblog.blog/post/migrating-large-tb-of-data-from-teradata-to-oracle-on-prem-oci-autonomous-a-step-by-step-guide
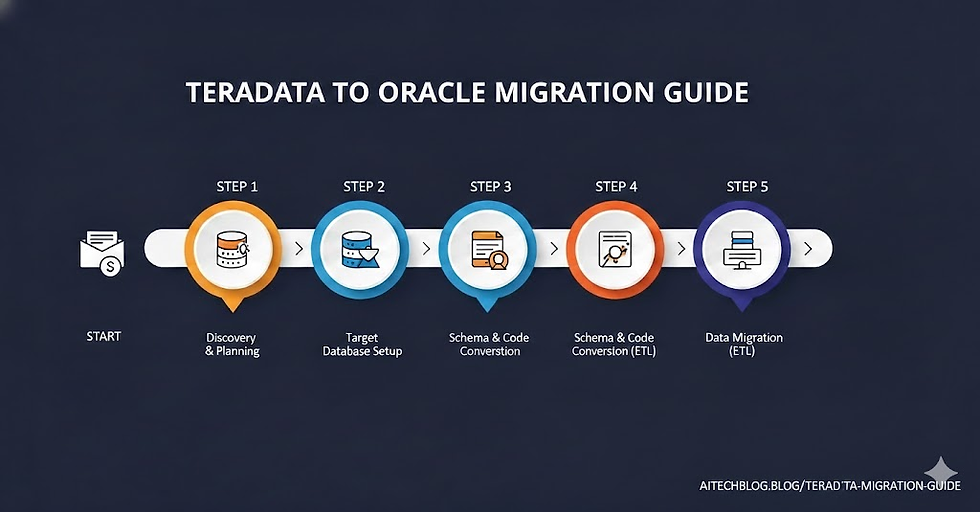
1. Prerequisites & Preparation
1.1 Check Environment & System Requirements
Source: Teradata (Linux & Windows) - 100TB
Target: Oracle Database (Linux - On-Prem & OCI Autonomous)
Migration Tools:
Teradata Parallel Transporter (TPT)
Oracle SQL*Loader (On-Prem)
Oracle Data Pump (For Oracle databases)
Oracle GoldenGate (Optional, for real-time replication)
OCI Data Transfer Service (For bulk data movement to OCI)
1.2 Install Required Tools on Source & Target Servers
On Teradata Server (Linux & Windows)
# Install Teradata Parallel Transporter (TPT) yum install tdload # Linux
On Oracle Linux Server (On-Prem & OCI Autonomous)
# Install SQL*Loader & Data Pump yum install oracle-instantclient-basic oracle-instantclient-sqlplus oracle-instantclient-tools
1.3 Setup Network Connectivity & Firewall Configuration
1.3.1 Enable Network Access Between Teradata and Oracle Servers
Identify IP Addresses: Ensure the source Teradata server and target Oracle server have valid IPs and can communicate.
Whitelist Oracle Server IP on Teradata Firewall:
sudo firewall-cmd --permanent --add-rich-rule='rule family="ipv4" source address="<oracle_server_ip>" accept' sudo firewall-cmd --reload
Open Required Ports:
Teradata default port: 1025
Oracle default port: 1521
sudo firewall-cmd --permanent --add-port=1521/tcp sudo firewall-cmd --permanent --add-port=1025/tcp sudo firewall-cmd --reload
Test Connectivity from Teradata to Oracle:
telnet <oracle_server_ip> 1521 ping <oracle_server_ip>
Check if OCI Autonomous Database is Reachable:
nc -zv <oci_autonomous_db_host> 1522
2. Target Database Setup (On-Prem & OCI Autonomous)
2.1 On-Prem Oracle Database Setup
Install Oracle Database on Linux.
Create a tablespace for the migrated data:
CREATE TABLESPACE teradata_migration DATAFILE '/u01/app/oracle/oradata/migration01.dbf' SIZE 100G AUTOEXTEND ON;
Create necessary schemas and users:
CREATE USER teradata_user IDENTIFIED BY password DEFAULT TABLESPACE teradata_migration; GRANT CONNECT, RESOURCE TO teradata_user;
2.2 OCI Autonomous Database Setup
Provision an Autonomous Database in OCI.
Download and configure the Oracle Wallet for secure connectivity.
Create required schemas:
CREATE USER teradata_user IDENTIFIED BY password; GRANT DWROLE TO teradata_user;
3. Data Extraction from Teradata
3.1 Using Teradata Parallel Transporter (TPT) Export
cat > export_script.tpt <<EOF USING CHARACTER SET UTF8; DEFINE JOB EXPORT_JOB DESCRIPTION 'Export data from Teradata' ( DEFINE OPERATOR EXPORT_OPERATOR TYPE EXPORT SCHEMA * ATTRIBUTES ( VARCHAR UserName = 'teradata_user', VARCHAR UserPassword = 'password', VARCHAR SelectStmt = 'SELECT * FROM my_table', FileWriterName = 'output_data.dat' ); APPLY TO OPERATOR (EXPORT_OPERATOR); ); EOF tbuild -f export_script.tpt -L export_log.log
4. Data Transfer to Oracle (On-Prem & OCI)
4.1 Transfer Data to On-Prem Oracle Server
scp output_data.dat oracle_user@oracle_server:/data/
4.2 Transfer Data to OCI (Using OCI CLI or Data Transfer Service)
oci os object put --bucket-name my-bucket --file output_data.dat
5. Data Loading into Oracle
5.1 Load Data to Oracle (On-Prem) Using SQL*Loader
cat > load_control.ctl <<EOF LOAD DATA INFILE 'output_data.dat' INTO TABLE my_table FIELDS TERMINATED BY ',' ( column1, column2, column3 ) EOF sqlldr userid=oracle_user/password control=load_control.ctl log=load_log.log
5.2 Load Data to OCI Autonomous Using Data Pump
expdp oracle_user/password DIRECTORY=DATA_PUMP_DIR DUMPFILE=exp_data.dmp LOGFILE=exp_data.log oci os object put --bucket-name my-bucket --file exp_data.dmp impdp admin@db_high DIRECTORY=DATA_PUMP_DIR DUMPFILE=exp_data.dmp LOGFILE=imp_data.log
6. Post-Migration Validation
6.1 Verify Data Counts
SELECT COUNT(*) FROM my_table;
6.2 Compare Sample Data
SELECT * FROM my_table WHERE rownum < 10;
7. Common Post-Migration Issues & Resolutions
Issue | Cause | Solution |
Data Type Mismatch | Different data types in Oracle & Teradata | Map correct data types before migration |
Data Truncation | VARCHAR size differences | Increase column size in Oracle |
Slow Performance | Indexes missing | Rebuild indexes post-migration |
8. Best Practices
Use Parallel Processing with TPT & SQL*Loader for speed
Compress Data before transferring to OCI
Validate data before switching production workload
Use GoldenGate for real-time replication if required
9. Estimated Time for Migration
Phase | Estimated Time |
Pre-Migration Checks & Setup | 1-2 days |
Target Database Setup | 1-2 days |
Data Extraction from Teradata | 3-5 days (parallelization & tuning applied) |
Data Transfer to Target (On-Prem & OCI) | 2-4 days |
Data Loading into Oracle | 4-6 days (parallel load tuning applied) |
Post-Migration Validation | 1-2 days |
Go-Live & Final Checks | 1 day |
Total Estimated Time | 13-21 days |


Comments